26
Nov
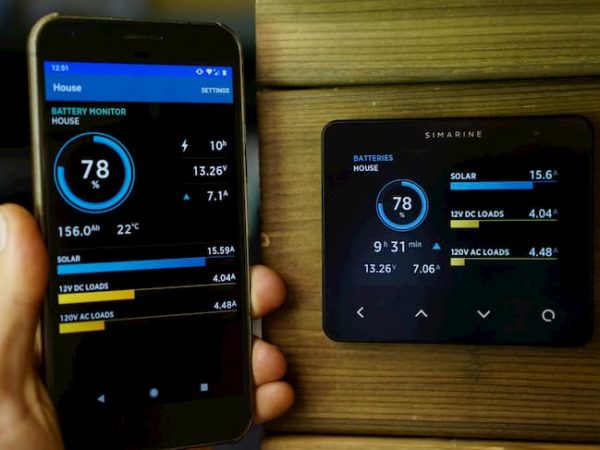
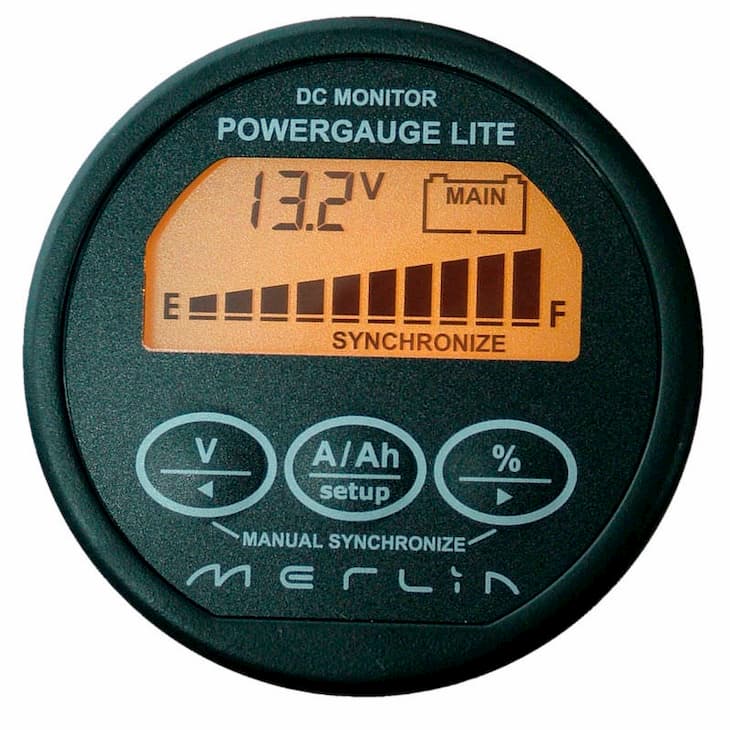
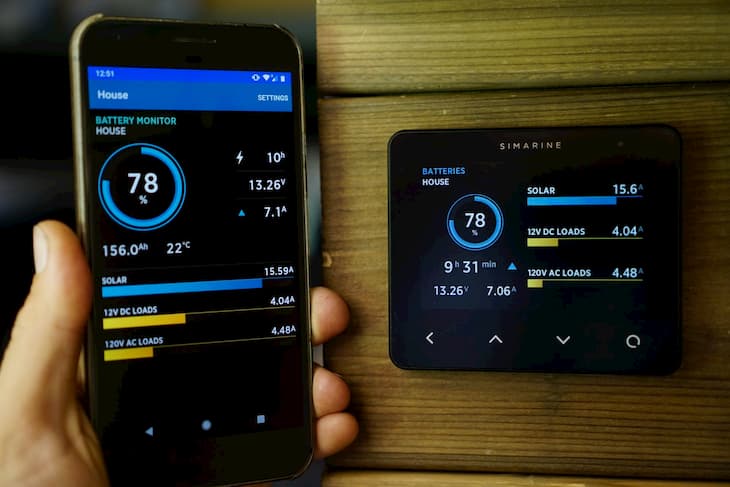
How do you know if the batteries on your boat are getting enough charge? Are the wind turbine or solar panels sufficient to power every appliance you need? These are all questions worth asking if you have a boat, and in order to find the answer, you need a marine battery monitor. These devices display the net amps that go in and out of your boat’s battery and the net amp-hours since the last charge. Most marine battery monitors also show things like the percentage of full charge and the battery’s voltage, the battery’s temperature and a few other things, depending on the type of unit you got.
As a general rule of thumb, you don’t want to use more than half of your boat’s battery, simply because it shortens its lifespan. In fact, some battery experts recommend using the battery only down to about 60-70% before recharging. For that reason, knowing your battery’s total capacity in amp-hours, and how much you’re down at any given time allows you to preserve the life of your battery. The amps in/amps out metric are also worth knowing as it helps you figure out which appliances on your boat are spending energy. You can test how much every power every appliance spends by plugging it in and turning it on.
Source: youtube.com
A boat battery monitor can monitor a single battery, or they can also show the voltage on a second battery (starting battery, for instance). You can also wire up relays that automatically start a generator (if you have one on board) if the battery’ charge state gets to a certain point. Some monitors also allow you to control the shore charger and inverter. Installing marine battery monitors is pretty straightforward, and most people can do it themselves. However, if you want to wire the relays for charger, inverter or generator, you should consider hiring a professional to do the job for you.
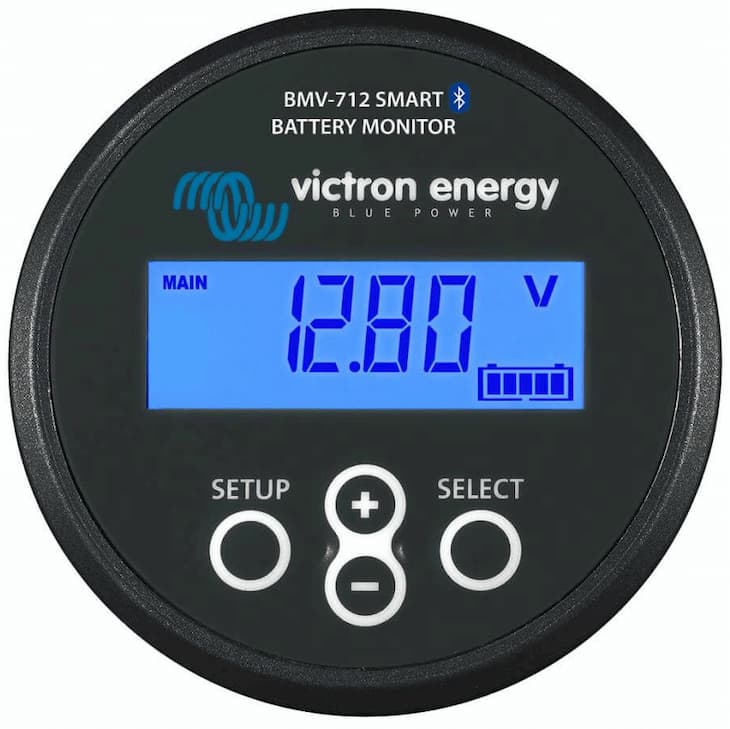
There are quite a few companies that make marine battery monitors, the most popular of which are Victron, Xantrex and Blue Seas. All of these brands feature similarly priced monitors. Victron monitors come with everything you need to install them, whereas Xantrex ones require a separate installation kit. Victron monitors are also easier to install – almost plug-and-play – whereas installing a Xantrex monitor is slightly more complex. Victron monitors work with just about any type of battery, including AGM, gel, Li-Ion and wet cell.
Source: faroutride.com
Before you install a boat battery monitor, make sure you clean up the previous wiring, if any. If you didn’t know, battery monitors operate with the help of a shunt that’s installed between the load (devices) and the negative post of the battery. If you want to properly track the amps in/out, you shouldn’t connect anything directly to the negative side of the battery beside the shunt. If you connect anything directly, it won’t be tracked. The easiest way to hook everything up is with the help of a bus bar. The negative wire will then go from the battery to the shunt, from the shunt to the bus bar, and then from the bus bar to every appliance.
I personally use a Victron battery monitor, the main reason being is that it’s too easy to install. It took me about a dozen hours to install it, but a fair portion of that time was making space to mount the monitor, and since I’m not a handy carpenter it took longer than it should. Where you decide to mount the monitor is completely up to personal preference, although that place should be easy and convenient to access so you can check the battery status whenever you want. The Victron battery monitor comes with a long cable, so you can place it almost anywhere on the boat, away from the battery itself. The Victron battery monitor is connected to the shunt with a phone cord, which makes it easy to run the wires and connect them properly.
Source: inutec-int.com
Lastly, you need to install the shunt and run the wires to it. You can use a negative cable to run from the shunt to the bus bar. The shunt features large posts, which are 3/8″, so you might have to place a new end on the negative cable. In order to do this, you might need wire cutters, crimpers and strippers that can be used on large wires. You’ll also need to buy and place the ends on a short jumper from the battery to the shunt. Lastly, you’ll need to connect the positive wire to the shunt so that the monitor is powered. Victron battery monitors come with either a single ring terminal on one end or a straight crimp and power wire on the other. There’s a fuse in between which you may need to remove while performing the connections.